
Table of Contents
Extraction Wizard
The Extraction Wizard allows you to create Extraction Schemes for capturing data from a source text into the columns of a Database. You can capture data from emails, cloud-systems, PDF files or any other kind of structured data.
You are able to define conditions on line, sub-line, word, and/or symbol level for each Database column while the extraction results are shown on-the-fly in the Test Result field.
The available options cover vastly more than you will need in typical usage. In most cases, you will need only 2 or 3 controls for each Database column. In special, complex situations, you can activate the Use Regex for text fields checkbox to inject regular expressions into your settings which open up literally unlimited possibilities.
To begin, paste a test string – e.g. a purchase order from which you want to extraction information – into the large Test String field on the right side and toy around a bit with the options, always first picking the Data Source (except you only want to write a Fixed Text into that Database column), and then trimming down the text to be extracted by applying various limitations on line, sub-line, word, and/or character level until the result matches the content you want to store in a Database. To undo a selection in any of the listboxes, simply double-click it.
You'll probably get how it works without reading the manual, although you might miss out on some less obvious functionalities and tricks. A detailed description of each control follows below. Alternatively, skip directly to the Examples section to gain intuitive understanding.
To open the Extraction Wizard:
⯈ Right-click into the Schemes listbox on the Home tab and select Create new from the context menu.
The Auto Book Dataviewer will open and show the available Database column headers. Each row represents one set of column headers.
If no row contains the headers you want, add a new row and type your own headers or modify the existing ones. Don't forget to click Save if you want to keep your changes for later use.
When you are done, select the row of headers you want to use and click the Select button at the right end of the bottom ribbon.
Note that the headers only have descriptive purpose. That is, Extraction Schemes with any headers are compatible with all Databases, no matter if their column headers are different. So your choice of headers isn't of critical importance, but it makes sense to give them names that make clear what you want to capture in each column. If for now you just want to try it out, just choose any set of headers.
The Extraction Wizard will open in Single Column View mode.
1. The Single Column View
The Single Column View of the Extraction Wizard shows the controls for configuring a single Extraction Scheme column. The text captured by applying the settings of the Extraction Scheme's first column will be inserted into the first Database column, and so on. The names of the Extraction Scheme and Database columns won't influence this, that is, if your first Extraction Scheme column is called “Date”, while “Date” is the second column of the Database, the captured date data will still be added to the first Database column. The advantage of this approach is that all Extraction Schemes remain compatible with all Databases, independently of column names.
The interface may look complex, but don't worry. It's not difficult.
1.1 Overview
The screen is divided into a main part, where you define which text should be extracted, and a right-side panel which shows the results of your settings on-the-fly when applied to a test string. Be sure to paste a sample text into the Test String field and confirm that your settings really yield the result you expect.
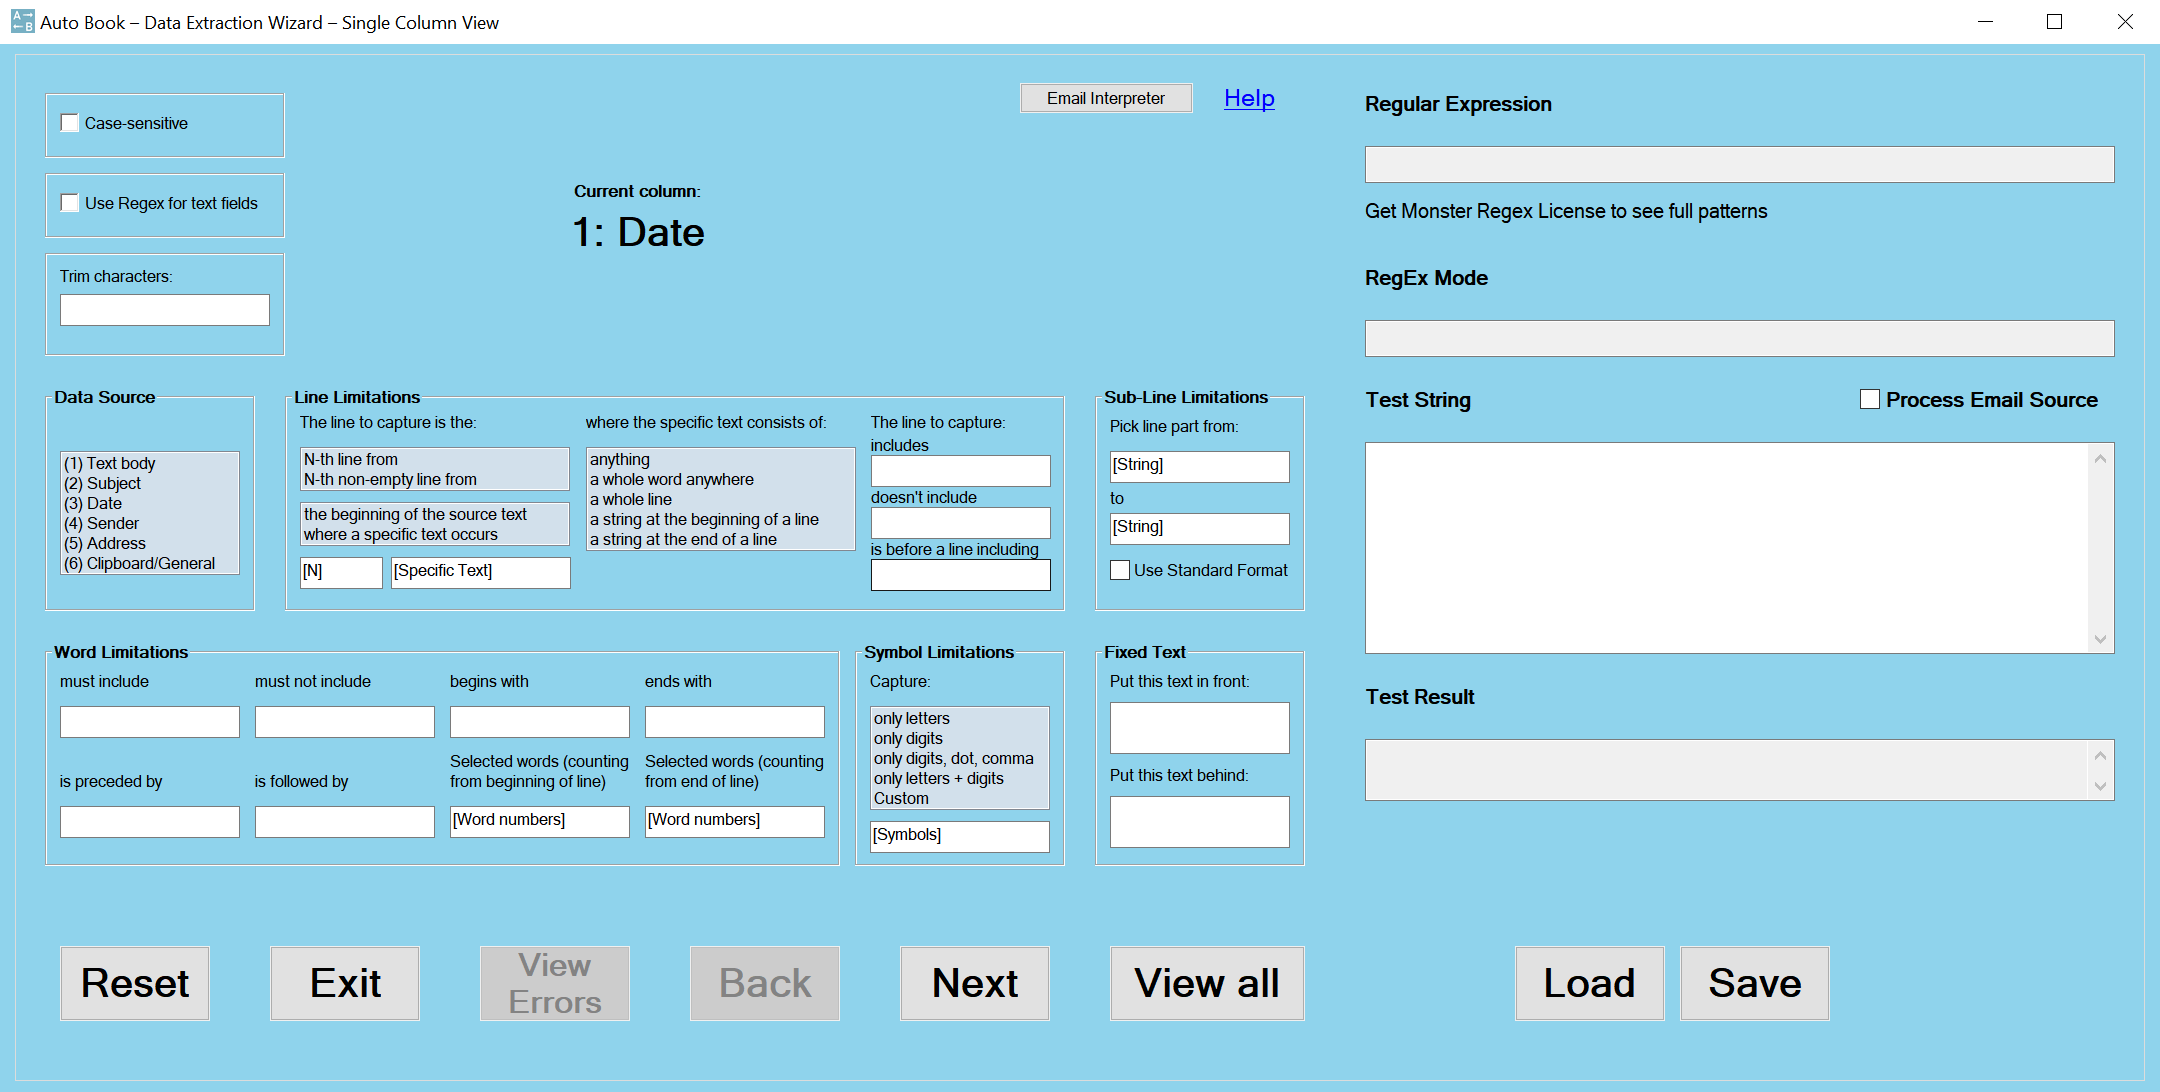
1.1.1 The Main Part
Centrally on top of the main part, the current column number and its title are shown. In this example, “1: Date”. Use the Back and Next button at the lower end of the screen to switch between columns.
The controls in the main part are structured into 6 groups: Data Source, Line Limitations, Sub-Line Limitations, Word Limitations, Symbol Limitations and Fixed Text. Additionally, there are two checkboxes and the Trim characters field in the top left area.
If you click any of the controls, the controls that are incompatible with the clicked control are automatically disabled (grayed out). If you double-click a selected control, the control will be cleared and any deactivated incompatible controls will be re-enabled. To clear all controls of the current column, click the Reset button.
If your settings are incomplete or inconsistent, the View Errors button becomes activated. Click on it to see information on how to fix your settings.
Always choose a Data Source if you want to capture any received text; that is, only leave Data Source empty if you want to leave the corresponding Database column blank or only enter Fixed Text. After picking the Data Source, you can define in which your line the text to be extracted is found via the Line Limitations group. You can further refine your settings via Sub-Line Limitations, which allow you to pick only a certain part of a line, Word Limitations, which are used to pick only words fulfilling certain conditions, and Symbol Limitations, which limit the type of symbols (characters) that will be included in the extraction result. None of these four groups are mandatory, that is, you can, for example, only use Word Limitations without defining the line in which the text to be extracted is found, and so on.
The basic principle is the same as when running a search using multiple search conditions. Each application of any type of limitations narrows down the extraction result that Auto Book will return. Apply as many limitations as are necessary to define the text you want to extract and store in a Database.
Finally, regardless of your other settings, you always have the option to insert Fixed Text (including dynamic components such as the current date/time) into the current Database column, which, if you have used any of the other controls to extract text, can be placed before or after the extracted text. See below for detailed explanations.
Use the View All button to switch to the All Columns View, a condensed overview showing your settings for all 10 columns. Here, all the controls of the Single Column View are available as well (apart from the right-side panel), but for space reasons, some explanations are missing. You can return from the All Columns View to the Single Column View at any time (for details, see All Columns View).
When you're done with your settings for all columns – up to 10, but you don't need to use all – click the Save button to create your Extraction Scheme. You will be able to reopen your settings and make adjustments later via the Load button.
To exit the Extraction Wizard, click, as you might have guessed, Exit (you will be prompted for unsaved changes).
1.1.2 The Right-Side Panel
The right-side panel is used for testing the inputs you've made in the main part.
Paste a sample text – e.g. an email containing the data you want to extract – into the Test String field of the right-side panel. While you make selections or enter text, your input is constantly evaluated and the result shown in the Test Result field in the right-side panel, if no mandatory settings are missing. That is, the Test Result field shows which data would be extracted from your Test String when the settings you have made are applied.
If you activate the Process Email Source checkbox, your test string is assumed to be an email source, and it will be pre-processed in the background to extract the email's text body, subject, sent date, sender name, and sender email address. In this case, the Test Result field will show the result of applying your settings to the content of the selected Data Source instead of the whole test string. For example, if you select (3) Date
as Data Source, your extraction settings will be applied to the email's sent date as indicated in the email header. To see the content of each Data Source, simply click each source in the listbox without making any other selections while the Process Email Source checkbox is activated.
The Regular Expression and RegEx Mode fields will also be updated automatically whenever you make selections or enter text. They show the beginning of the RegEx patterns used internally to extract your data or the full patterns with Monster Regex License. If you don't know what RegEx is, don't worry about it. These fields are for informational purposes only – for users who want to understand the inner workings of Auto Book or use the RegEx patterns for other purposes than Auto Book. It's fine to ignore them, as the Wizard will handle everything for you.
1.1.3 The Email Interpreter
The Email Interpreter is opened via the button in the top right area of the Extraction Wizard's main part. It allows you to see the result of decoding an email source in Auto Book.
This functionality is intended for troubleshooting, and you probably will never need it. If you're just reading the manual to learn general usage, skip ahead to the next section for now.
Auto Book can decode all common email encoding schemes such as Quoted-Printable, BASE64, etc., and also parses HTML. When you press Auto Book's Email Source Extraction hotkey, the selected text or clipboard's content is assumed to be an email source and decoded internally. Your Extraction Schemes are then applied to this decoded content instead of the raw text you are seeing on your screen.
The decoding results can also be viewed by pasting the email source into the Test String field and clicking the Process Email Source checkbox in the right-side panel, and then selecting a data source – the only difference is that the Email Interpreter will show the decoding result of the whole email, including both the header and the text body.
After you click the Email Interpreter button, an empty window will open.
Don't copy anything into this window. Rather, open the email source you want to decode in your email client and copy it into the clipboard by pressing CTRL+C
. The decoded text will then, after about half a second, automatically pop up in the Email Interpreter window. The whole email should now be displayed as plain text – if not, the email's encoding is not supported by Auto Book or was not recognized.
1.2 Extraction Settings
1.2.1 General Settings
1.2.1.1 Case-sensitive checkbox
If this option is activated, matching for text entered into any of the text input fields is case-sensitive. That is, if you enter PO
into the must contain field of the Word Limitations group, for example, PO123
will be found, but not Po123
.
1.2.1.2 Use Regex for text fields checkbox
If this option is activated, strings entered into any of the text input fields of the Extraction Wizard (except the [symbols] field and the Fixed Text fields) are interpreted as Regular Expressions instead of plain text.
If you don't know what Regular Expressions are, just ignore this section for now.
If you do know how to use Regular Expressions, this option gives you additional flexibility in rare cases where the standard options below don't provide what you need. All of PCRE Regex is supported.
Thus, for example, you can require that a word includes any single digit by typing \d
into the must include field of the Word Limitations group. You can also use Lookaheads, Lookbehinds, anchors such as ^
or $
, character classes, and so on.
There are plenty of tutorials online for learning Regular Expressions, if you are keen to do so. An extremely helpful site for testing your patterns is https://regex101.com/. Finally, here is a tiny overview over the most useful expressions:
| . | any symbol except linefeeds |
| \d | any digit |
| [a-zA-Z] | any English letter |
| \pL | any letter from any language |
| ? | makes the preceding symbol optional |
| * | allows any number of the preceding symbol, as many as possible |
| + | allows any number of the preceding symbol, as many as possible, at least one |
| +? | allows any number of the preceding symbol, as many as necessary, at least one |
| {2} | exactly two of the preceding symbol |
| {2,5} | between two and five of the preceding symbol |
| {2,} | more than two of the preceding symbol |
| {,2} | less than two of the preceding symbol |
| | | or |
| ^ | beginning of a line |
| $ | end of a line |
| (?=…) | Lookahead |
| (?!…) | Negative Lookahead |
| (?<=…) | Lookbehind |
| (?<!…) | Negative Lookbehind |
The following symbols must be escaped with a backslash (\
) when used literally: \
, ^
, $
, .
, |
, ?
, *
, +
, ()
, []
, {}
IMPORTANT NOTE: If you use any brackets in your RegEx pattern, make sure to include ?:
as first symbols after the opening bracket to make it non-capturing, if it is not non-capturing by default. Otherwise, you will break Auto Book's algorithm. Thus, to find find A
followed by X
or Y
, for example, use A(?:X|Y)
.
1.2.1.3 Trim characters field
Enter any characters into this field that you want to be removed from the beginning and end of the extraction result. For example, if you extractions settings sometimes return a “,” at the end of the extracted word which you don't want, type ,
into this field.
Spaces and tabs are always automatically trimmed so that you don't need need to type them here.
1.2.2 Data Source
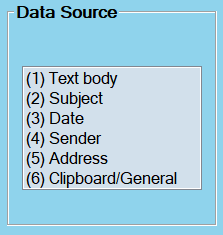
The choice of the data source is important only if you are are going to use Parameter Extraction Mode or Email Source Extraction Mode. For Normal Text Extraction, your selection won't make a difference, because you are using only one piece of text for data extraction (the text within the clipboard); in this case, click either (6) Clipboard/General or any of the other options in case you want to make your Extraction Scheme compatible with other methods of data transmission.
Otherwise, pick the source from which you want to extract the data for this Database column:
(1) Date: The email date as indicated by your email client.
(2) Sender: The email sender name as indicated by your email client.
(3) Subject: The email subject as indicated by your email client.
(4) Address: The email address of the sender of the email as indicated by your email client.
(5) Text: The text body of the email as indicated by your email client.
(6) Clipboard/General: Select this option only if not using Parameter Extraction Mode or Email Source Extraction Mode.
If you're going to process the email source, these sources – Date, Sender, Subject, Address and Text (body of the email) are automatically extracted from the email source, and your Extraction Scheme settings will be applied onto these resulting sources. Thus, if you are going to extract a part of an email's subject line, for example, you don't need to worry about capturing the subject line from the email source, but only need to make the settings to define which part of this single line you need. As another example, if you select Date as your source for a certain column, you won't need to make any other settings if you're happy to capture the whole date as per email source into your Database – selecting a source without any other limiting settings means you are going to keep the whole source.
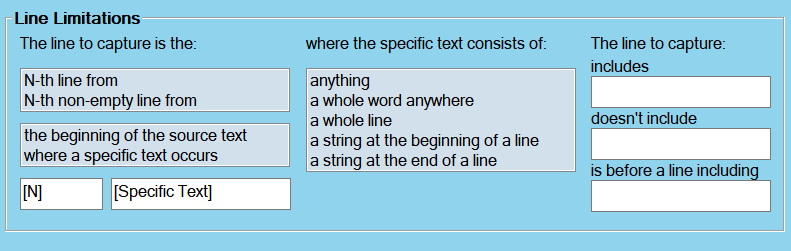
1.2.3 Line Limitations
Line limitations allow you to define from which lines you want to extract text. If you have no need to do so – if, for example, you are able to capture to desired content merely by placing conditions on the words to be extracted under Word-Limitations, or obviously, if your source text contains only a single line of text (such as an email's subject line, etc.), simply leave them empty.
If you are only using Line limitations but no other limiting settings, the first matching line will be inserted into your Database as a whole.
1.2.3.1 Defining lines to capture by explicitly indicating their position
The left and middle block of the Line Limitations group (the controls below The line to capture is the: and where the specific text consists of) allow you to define a line or several lines in which the text to be extracted is found by explicitly indicating its/their position relative to either the beginning of the source text or a line where a specific text occurs.
This is done by entering the line number or range of numbers into the [N] field. The initial line – the beginning of the source text or the line where the specific text occurs – is considered line 1, the next line is line 2, and so on. To define a range of line numbers, enter, for example, 2-5
or 1<N<6
for lines from the 2nd to the 5th, <5
for lines up to the 4th, >1
for all following lines, and so on. Negative line numbers are currently not supported, but might be implemented in a later Auto Book version.
When indicating a range of lines, note that at most one line will be inserted into your Database. If you don't make any other limiting settings (e.g. via Word Limitations), the first line of your range will be captured. If you do make other limiting settings, the first line with content that fulfills all other conditions as well will be captured. For example, if you stipulate that captured words must include the letters EUR
, the first line of your range where such a word appears will be captured.
To count only lines that include some content (anything else than whitespace), click N-th non-empty line from in the top field. Otherwise, to count all lines, click N-th line from.
If you opt to define the line(s) relative to a specific text, the control under where the specific text consist of is automatically pre-set to anything, which means that you don't want to place any further restrictions on the specific text. If you do want to place further restrictions, click on the relevant option.
Examples:
- If the text to be extracted is known to be in the very first line of the source text, pick the beginning of the source text in the second control field and enter 1
into the [N] field.
- If the text to be extracted is found in a line below the word Remuneration
, click where a specific text occurs, enter 2
into the [N] field – since the line where Remuneration appears is considered line 1 – and enter Remuneration
into the [Specific Text] field.
By indicating a range of lines or counting only non-empty lines, you are able to implement some tolerance in case the data you receive is not always strictly following a certain layout.
1.2.3.2 Other ways of limiting the line to capture
The controls under The line to capture: give you some additional options for defining which line in the source text should be captured. That is, you can require that the desired line includes a certain text string (includes field) or doesn't include a certain text string (doesn't include). Also, you can require that a certain text string appears in the following line (is before a line including).
Note that any or all of these options can be combined with the controls to the left for explicitly indicating the line position. That is, you could be looking for a line within the first 10 lines of the text including the word USD
, for example.
1.2.4 Sub-Line Limitations
Sub-line limitations allow you to capture a part of a line from after a user-defined string (“from” string) until before another user-defined string (“to” string).

- Both the “from” string and the “to” string are optional. If the “from” string is not filled in, the line will be extracted from its beginning until the “to” string. Correspondingly, if the the “to” string is missing, the line will be extracted from after the “from” string until the end of the line.
- If a string occurs multiple times in a line, the occurrence of the string that causes that maximizes the length of the extracted line is used. That is, in case of the “from” string, the first occurrence is used, and in case of the “to” string, the last occurrence is used.
Examples will make clear that the idea is really very simple:
username@domain.com
⯈ To capture username
, enter @
into the to field.
⯈ To capture domain
, enter @
into the from field and .
into the “to” field.
⯈ To capture com
, enter .
into the “from” field. (This approach obviously won't work if there are dots in the username as well. In such as case, you could activate Use Regex and enter @.*\.
into the “from” field.)
⯈ To capture domain.com
, enter @
into the from field.
PO: XY123456
⯈ To capture XY123456
, enter :
or PO:
(a trailing space is optional). By entering PO
, you make sure that only lines including PO:
will be captured, if you haven't defined the line via Line Limitations. Otherwise, the first line including :
will be used.
(This example is identical to using the Standard Format in case PO
is also the column title.)
1.2.4.1 Use Standard Format checkbox
To extract text based on the Standard Format, activate the Use Standard Format checkbox. It's in this group of controls because it is, in effect, a kind of pre-defined sub-line limitation.
This means that you are going to extract the line part following the column header and a colon, such as 2022-12-31
from the line Date: 2022-12-31
if Date
is the column header. As this is a pre-defined complete column configuration, all other controls will be disabled, except Fixed Text, which you still can add before or after the extracted text.
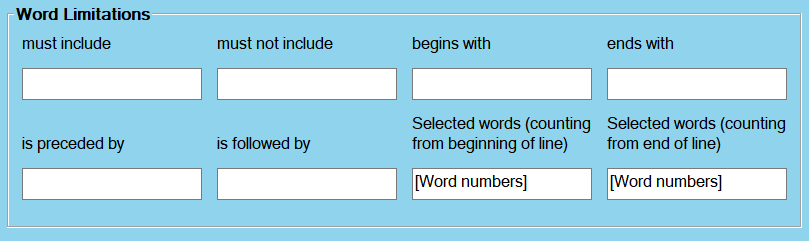
1.2.5 Word Limitations
Word limitations allow you to limit the extraction to words fulfilling certain conditions, e.g. that words that begin or end with certain strings or include or don't include certain strings or are preceded or followed by certain strings. The 6 fields with which to apply these conditions are hopefully self-explanatory.
💡 A “word” in Auto Book refers to a string of arbitrary symbols separated from other text by whitespace (spaces, tabs, line-breaks). That is, PO123456
and 123.45
are both considered single “words”. (An option to set your own word-boundary conditions might be implemented in a later Auto Book version.)
These conditions can be freely combined with any of the other controls of the Extraction Wizard except Sub-Line Limitations. That is, you can look for these words only in certain lines by using Line Limitations or restrict the letters extracted from these words with Symbol Limitations.
In addition, all of these 6 fields accept the logical operators AND and OR. Thus, to find words that include both PO
and 2022
, enter PO AND 2022
, and so on. Note that these operators must be written in CAPITAL LETTERS. (They can be escaped with a backslash: \AND is literal AND and \OR is literal OR.) You can use any number of ANDs or ORs in a text field, but, in Auto Book 1.1, not a mixture of ANDs as well as ORs.
If you know Regex, enabling the Use Regex for text fields checkbox opens up a broad range of additional possibilities. As a simple example, you could enter \b\d+\.\d\d\b
into the must include field to capture pure numbers with exactly 2 decimals. More complex constructions are also possible – in principle, all of PCRE Regex is supported.
Furthermore, you can define the words to be extracted by explicitly indicating their position within a line with the two bottom right fields of the Word Limitations group.
For example, to capture the first 3 words of a line:
⯈ Enter 1-3
into the field Selected words (counting from beginning of line)
Or to capture the 4th last and 2nd last word of a line:
⯈ Enter 2, 4
into the field Selected words (counting from end of line)
These two fields cannot be combined with each other – you have to count either from the beginning of from the end of the line. Furthermore, these two fields can only be combined with Line Limitations and Fixed Text. The other groups will be deactivated as soon as you type something in one of these fields.
Typically, you will use Line Limitations to define the line to operate on and then use the Selected words fields to pick certain words. If you do not use Line Limitations, the first line that has at least as many words as are necessary to fulfill your selection will be used – for example, if you specify words 1-3, lines with only 2 words will be skipped and the first line with at least 3 words will be used.
1.2.6 Symbol Limitations
1.2.6.1 Predefined Symbol Limitations
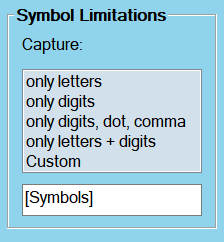
While the Line Limitations group of controls allows you to limit the extracted text to a specific line and Word Limitations set conditions on word-level, Symbol Limitations allow you to further limit or narrow down the extraction to certain symbols.
Click on one of the four predefined sets of character classes – only letters, only digits, only digits, dot, comma, or only letters + digits – to allow only symbols of that type.
These limitations work at character level, i.e. if you limit the expression “PO123465” to “only digits”, only “123456” will be extracted.
1.2.6.2 Custom Symbol Limitations
Selecting the Custom option of the Symbol Limitations listbox allows you to define your own limitations in the [Symbols] field below. Enter any single character or any expression that would be permissible within square brackets in PCRE Regex, without the square brackets themselves. That is, entering a-zA-Z
would allow all letters of the English alphabet, for example, and \-+0-9.,$€£
would allow plus and minus signs, digits, dots, commas, and $, €, and £ characters.
If you use the negation ^
as the very first character, you switch to exclusion mode and all following characters you enter will be disallowed instead of allowed. That is, ^0-9
would allow anything except digits.
Note that there are four symbols that must be escaped if you intend to include or exclude them because they are part of the Regex syntax. These four symbols are -
, ^
, ]
, and /
. To escape these, put a \
in front. Thus, to allow -
, for example, enter \-
; to allow anything except \
, enter ^\\
; to allow ^
, enter \^
, and so on.
The following tables shows some more examples on how to define character classes in Regex. Remember that in each case, the [] should not be entered into the [Symbols] fields. For further information, use a search engine to search for Regex character classes.
| One way to do it | Another Way | Characters allowed |
| [\pL] | Any kind of letter from any language | |
| [\w] | [A-Za-z0-9_] | Word characters |
| [\W] | [^A-Za-z0-9_] | Non-word characters |
| [:alnum:] | [A-Za-z0-9] | Alphanumeric characters |
| [:alpha:] | [A-Za-z] | Alphabetic characters |
| [:digit:] | [0-9] | Digits |
| [^0-9] | Non-digits | |
| [:lower:] | [a-z] | Lowercase letters |
| [:punct:] | [!"#$%&'()*+,./:;<=>?@\^_`{|}~-] | Punctuation characters |
| [:upper:] | [A-Z] | Uppercase letters |
1.2.7 Fixed Text
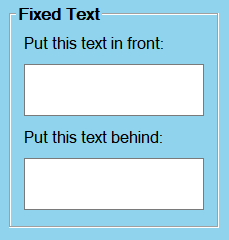
The two fields in the Fixed Text group allow you to add fixed text, ie. text independent of the source text, in front of or behind the extracted text.
If you want to store ONLY fixed text for this Database column, simply leave all other fields empty. In this case, it doesn't matter whether you use the Put this text in front or Put this text behind field, as there is nothing to put it in front of or behind.
The Fixed Text fields also accept a few commands that make it somewhat dynamic - it's called “fixed” because it doesn't depend on the source text. Simply enter each command including the tags <> into either one of the Fixed Text fields. When saving data to a Database, these commands will be automatically replaced as detailed below:
| <AutoFolder> | Will be replaced with the folder path generated from the Auto Folder pattern saved with this Extraction Scheme. |
| <Time> | Will be replaced with the current time and date in the system locale format (click the Test button if you're unsure what this format looks like on your computer). |
| <Time.Format> | Will be replaced with the current date and/or time in a user-defined format. |
The Time commands will also be replaced in the Test Result field, but <AutoFolder> is not because the Auto Folder pattern has not yet been set at this point.
1.2.7.1 Date/Time Formats
To define the format when using the <Time.Format> command, refer to the table below. Simply replace “Format” in the command with the components you need plus any punctuation.
For example, <Time.yyyy-MM-dd> will be replaced with today's date in ISO format (e.g. 2021-12-31).
| d | Day of the month without leading zero (1 - 31) |
| dd | Day of the month with leading zero (01 – 31) |
| ddd | Abbreviated name for the day of the week (e.g. Mon) in the current user's language |
| dddd | Full name for the day of the week (e.g. Monday) in the current user's language |
| M | Month without leading zero (1 – 12) |
| MM | Month with leading zero (01 – 12) |
| MMM | Abbreviated month name (e.g. Jan) in the current user's language |
| MMMM | Full month name (e.g. January) in the current user's language |
| y | Year without century, without leading zero (0 – 99) |
| yy | Year without century, with leading zero (00 - 99) |
| yyyy | Year with century. For example: 2005 |
| gg | Period/era string for the current user's locale (blank if none) |
| h | Hours without leading zero; 12-hour format (1 - 12) |
| hh | Hours with leading zero; 12-hour format (01 – 12) |
| H | Hours without leading zero; 24-hour format (0 - 23) |
| HH | Hours with leading zero; 24-hour format (00– 23) |
| m | Minutes without leading zero (0 – 59) |
| mm | Minutes with leading zero (00 – 59) |
| s | Seconds without leading zero (0 – 59) |
| ss | Seconds with leading zero (00 – 59) |
| t | Single character time marker, such as A or P (depends on locale) |
| tt | Multi-character time marker, such as AM or PM (depends on locale) |
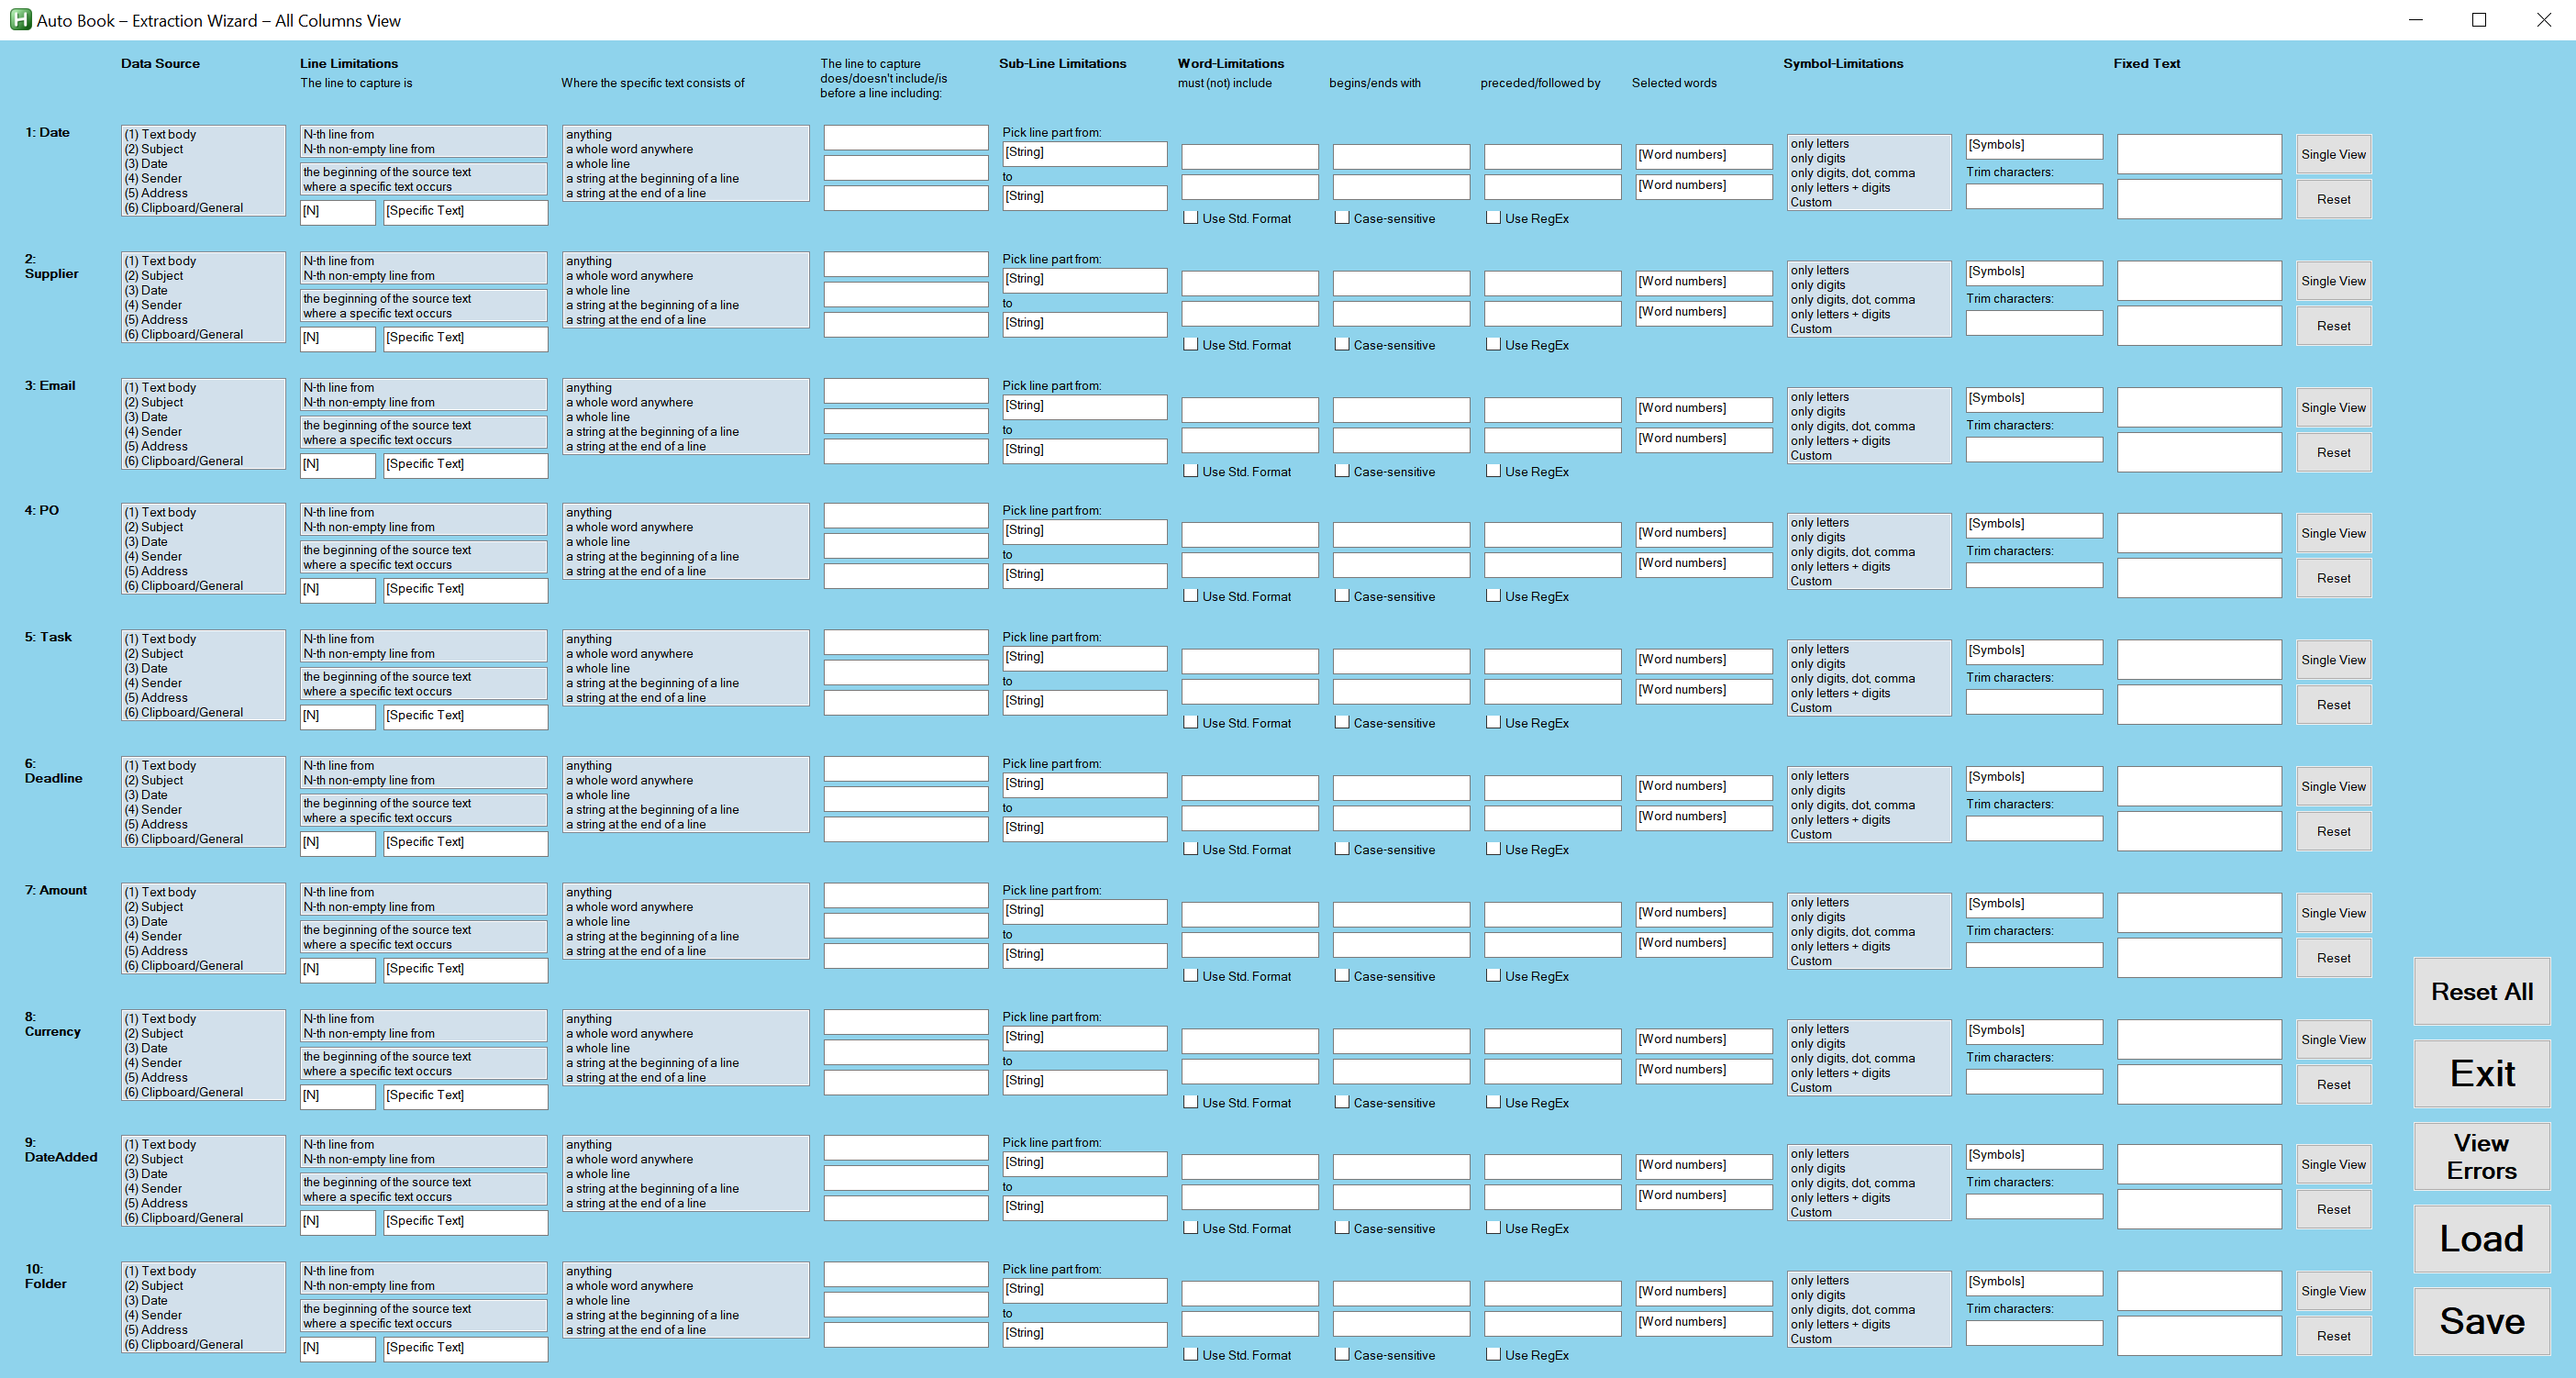
2. All Columns View
The All Columns View of the Extraction Wizard shows the settings for all columns in a single window; only the testing panel and tooltips are missing. It is recommended to test your settings before saving them, but if you feel that's not necessary, you can work exclusively in the All Columns View. It's more useful for a final review before saving, however.
The buttons at the end of each row of controls (corresponding to one Extraction Scheme column), namely the Single Column View and Reset buttons, allow you to return to the Single Column View of the respective Extraction Scheme column and reset (clear) your entries for one column, respectively.
The larger buttons at the lower right end of the window are described as follows:
Exit: Exit the Extraction Wizard (you will be prompted for saving changes).
Reset all: Clear all controls for all columns. This cannot be undone – use this button only if you really want to start from scratch.
View Errors: This button is normally deactivated (grayed out) and becomes available “on-the-fly” if your settings are inconsistent. It works the same way as the respective button in the Single Column View, but checks all columns for errors.
Load: Load an Extraction Scheme.
Save: Save the Extraction Scheme generated based on your settings.
After saving, the Extraction Wizard will close and your Extraction Scheme will automatically appear in the Schemes listbox of the Home tab, ready for use.
3. Examples
3.1 Order Email
See this example as a Video
We will show step-by-step instructions for two examples for Auto Book's primary use case, that is, extracting purchase order information from emails. In the first example that follows immediately below, we will extract these information from the email text body as it is displayed in an email client. In the second example, we will use the email source instead to get all data we want (see Extracting from email source).
3.1.1 Extracting from email text body
Assume you are repeatedly receiving emails more or less in the following format:
Dear Mr. XXX,
We would like to request your services for the following job PO123456:
DESCRIPTION
Data preparation
QUANTITY
42 Page(s)
DEADLINE
07/16/2022
Remuneration: USD 420
Please inform us until 07/15/2022 2 p.m. whether you can carry out the job.
Thank you very much.
Please do not hesitate to contact us for all further questions you might have.
Best regards,
Jane Doe
SampleCompany, Ltd.
And you would like to extract all relevant information, that is the date, PO number, description, quantity, deadline, remuneration, client, and project manager in order to save these data to a Database each time you receive a purchase order.
⯈ Open the Extraction Wizard.
⯈ Enter a new set of column headers: Date, Client, PM, PO, Description, Quantity, Deadline, Remuneration, Comment1, Comment2.
⯈ Press Save to save these headers in case you need them again.
⯈ Select this row of headers and press Select.
The Extraction Wizard will open in Single Column View showing the first column, Date.
To confirm that you settings for each column are correct, paste the above sample email into the large Test String field on the right side. Whenever you complete the instructions below for one of the columns, the extraction result will be automatically displayed in the Test Result field below.
Date: In this sample email, the client did not indicate an order date. We could use either Parameter Extraction Mode or Email Source Extraction Mode to capture the email's sent date. However, let's assume we want to stick with simplest case of using Normal Extraction Mode, whereby you will select the email text with your mouse in your email client and then press CTRL+SHIFT+E
. In this case:
⯈ Type <Time.yyyy-MM-dd>
into either one of the Fixed Text fields (it doesn't matter which one).
This will simply write the current date in ISO format into the first column of the Database. Optionally, replace yyyy-MM-dd
with a date/time format of your liking.
That's all we need for column 1 – click Next to continue with column 2.
Client: Assuming we are creating an Extraction Scheme for one particular client, simply paste the Client's name into one of the Fixed Text fields, in this example SampleCompany, Ltd.
. We could also extract it in a similar way as the project manager's name in the next column by setting N to 3 instead of 2, but let's keep it as simple as possible. Click Next to continue with column 3.
PM:
In the PM column, we want to capture the project manager's name.
⯈ Click on (6) Clipboard/General in the Data Source listbox.
⯈ Click on N-th non-empty line from and where a specific text occurs in the Line Limitations group.
⯈ Enter 2
for N.
⯈ Enter Regards OR Wishes OR Greetings OR Sincerely
for Specific Text.
This approach is somewhat fuzzy in so far as the 4 words used as alternatives for Specific Text also could appear in a different context somewhere else within an email. However, for typical order emails, this shouldn't happen often and if it does, the name can be edited in the Data Preview.
Click Next.
PO:
There are many ways to extract the PO number. Which is best depends on how closely we expect the client to stick to the sample format.
Assuming all PO numbers start with PO
, a simple, very flexible method is:
⯈ Click on (6) Clipboard/General in the Data Source listbox.
⯈ Enter PO
into the begins with field of the Word Limitations group.
⯈ Click on only letters + digits in the Symbol Limitations group to get rid of the colon or any other punctuation marks the client might use.
⯈ To avoid capturing words such as porridge, make the matching case-sensitive by activating the case-sensitive checkbox.
Alternatively, if all PO numbers consist of PO
and some numbers, we could also use this method:
⯈ Activate the Use Regex for text fields checkbox.
⯈ Click on (6) Clipboard/General in the Data Source listbox.
⯈ Enter PO\d+
into the begins with field of the Word Limitations group – \d+
means at least one digit and \b
requires a word boundary (i.e. that a non-word symbol follows, w requires that the word ends after an arbitrary number of digits).
⯈ Click on only letters + digits in the Symbol Limitations group to get rid of the colon or any other punctuation marks the client might use. (Alternatively, you could type .:!?,
, for example, into the Trim characters field to get rid of common punctuation marks.)
If the client always uses the same introductory sentence, We would like to request your services for the following job PO123456:
, where only the PO number changes, we could also, for example:
⯈ Click on (6) Clipboard/General in the Data Source listbox.
⯈ Enter for the following job
into the Pick line part from field of the Sub-Line Limitations group and :
into the To field.
There are more ways to capture the PO number in this example, e.g. using the is preceded by field of the Word Limitations group or using Line Limitations to define the line and entering 1
into the Selected words (counting from end of line) field and then using Symbol Limitations again to get rid of the colon. But let's continue with column 4 - click Next again.
Description, Quantity, and Deadline:
We'll use the same method for all of these, namely:
⯈ Click on (6) Clipboard/General in the Data Source listbox.
⯈ Click on N-th non-empty line from and where a specific text occurs in the Line Limitations group.
⯈ Enter 2
for N.
⯈ Enter Description
, Quantity
, or Deadline
, respectively (for columns 4, 5, and 6) into the Specific Text field.
⯈ Optionally, change anything in the where the specific text consists of listbox to a whole line, which will make matching more restrictive and prevent that a wrong line is extracted if any of these words appear elsewhere in the email within a sentence.
Remuneration:
Again, there are many ways to extract the amount and currency. Let's stick with the simplest:
⯈ Click on (6) Clipboard/General in the Data Source listbox.
⯈ Activate the Use Standard Format checkbox in the Sub-Line Limitations group.
Nothing else needs to be done, because this piece of data conforms to the Standard Format, since the column is called Remuneration
and the text we want to extract follows Remuneration
and a colon (:
), as prescribed by the Standard Format. (If the column were named differently, we would have to enter Remuneration:
into the Pick text part from field.)
Saving the Extraction Scheme
Only the 2 Comments columns are left. We won't extract anything into these and keep them as a reserve in order to add notes to our records. We can use them, for example, to track whether each record has already been invoiced, etc.
So there's nothing left to do. Click Save and enter a name for the newly created Extraction Scheme. After the Extraction Scheme has been saved, click Exit to close the Extraction Wizard. Then, select the sample email text above and press the Extraction Hotkey (CTRL+SHIFT+E
by default). Select the name of the just created Extraction Scheme in the Schemes panel of the Data Preview that appears. All desired data should pop up, ready for being added to a Database via the Add to Database button. If you wish, also enter an Auto Folder pattern based on these data and create and open a folder by activating the corresponding checkboxes.
3.1.2 Extracting from email source
In this example, we will use an email only slightly modified from the example above (Extracting from email text body). The PO number, this time, is found only in the email's subject, but not in the text body. Furthermore, instead of using the current date, this time we want to extract the email's sent date, and we also want to extract the email's sender name instead of manually entering the client name.
As these information are not available within the text body, we have to use either Parameter Extraction Mode or Email Source Extraction Mode, and in this example, we are going to use the latter method. (The Extraction Wizard settings for Parameter Extraction Mode would actually be identical – the only difference is that we wouldn't be using the email source.)
Below is our sample email source. The header is slightly shortened for space reasons. If the header of your emails contains lengthy incomprehensible data salad, don't worry about it – Auto Book will simply ignore it.
Return-Path: <sampleemail@logitope.com>
Authentication-Results: kundenserver.de; dkim=none
Received: from mout.kundenserver.de ([212.227.126.133]) by mx.kundenserver.de
(mxeue012 [212.227.15.41]) with ESMTPS (Nemesis) id 1N491l-1nyd7N2PhZ-0103MP
for <recipient@logitope.com>; Fri, 13 May 2022 16:39:16 +0200
Received: from [192.168.100.130] ([116.118.9.66]) by mrelayeu.kundenserver.de
(mreue012 [213.165.67.97]) with ESMTPSA (Nemesis) id 1M8Syu-1nl8j52icy-004TMv
for <recipient@logitope.com>; Fri, 13 May 2022 16:39:16 +0200
Date: Fri, 13 May 2022 21:39:09 +0700
From: Logitope <sampleemail@logitope.com>
X-Mailer: The Bat! (v8.8.9) Home
Message-ID: <275225130.20220513213909@logitope.com>
To: “recipient@logitope.com” <recipient@logitope.com>
Subject: New job - PO123456
MIME-Version: 1.0
Content-Type: text/html; charset=us-ascii
Content-Transfer-Encoding: quoted-printable
<html><head><title>New job - PO123456</title>
<meta charset=3D“utf-8” http-equiv=3D“X-UA-Compatible” content=3D“IE=3D9; I=
E=3D8; IE=3D7; IE=3DEDGE” />
</head>
<body>
<span style=3D“ font-family:'times new roman'; font-size: 12pt;”>Dear Mr. X=
XX,<br>
<br>
We would like to request your services for the following job PO123456:<br>
<br>
DESCRIPTION<br>
Data preparation<br>
<br>
QUANTITY<br>
42 Page(s)<br>
<br>
DEADLINE<br>
07/16/2022<br>
<br>
Remuneration: USD 420<br>
<br>
Please inform us until 07/15/2022 2 p.m. whether you can carry out the job.=
<br>
<br>
Thank you very much.<br>
<br>
Please do not hesitate to contact us for all further questions you might ha=
ve.<br>
<br>
Best regards,<br>
<br>
Jane Doe<br>
SampleCompany, Ltd.<br>
The email source in this example contains some HTML tags such as <body>
and <br>
, because the email was sent in HTML format, as well as some unexpected equal signs at the ends of lines, for example in ha=ve
near the end of the email. These are due to so-called quoted-printable encoding. You don't need to deal with these, as Auto Book will decode the email. It's also possible that different kinds of encoding are used in emails you receive, most commonly Base64. In this case, you won't be able to see the plain text of your email in the source, but only unintelligible strings of characters.
When you paste an email source into the Test String field, activate the Process Email Source checkbox and select a Data Source, however, the decoded content of the data source will be shown in the Test Result field. All subsequent settings you make are not applied to the whole email source, but to the respective data source's content. (You can also see how the whole decoded email looks to Auto Book via the the Email Interpreter button.)
For the sake of completeness, the extraction steps for all columns are given below. If you already read the example of the previous section, you can skip all the sections except those concerning the first, the second, and the fourth column, as all other steps are identical to the previous example. If you want to recreate the Extraction Scheme exemplified here to try it on your computer and have saved the Extraction Scheme of the previous example, go the to Home tab of Auto Book, right-click the previously created Extraction Scheme and select Duplicate from the context menu. Then right-click onto the copy of that Extraction Scheme in the Extraction Schemes panel and select Open Settings. Then only modify columns 1, 2 and 4 following the instructions below and save.
As in the previous example, we want to extract the date, PO number, description, quantity, deadline, remuneration, client, and project manager.
⯈ Open the Extraction Wizard.
⯈ Enter a new set of column headers: Date, Client, PM, PO, Description, Quantity, Deadline, Remuneration, Comment1, Comment2.
⯈ Press Save to save these headers in case you need them again.
⯈ Select this row of headers and press Select.
The Extraction Wizard will open in Single Column View showing the first column, Date.
To confirm that you settings for each column are correct, paste the above sample email source into the large Test String field on the right side. Whenever you complete the instructions below for one of the columns, the extraction result will be automatically displayed in the Test Result field below. You will also notice that as soon as you select a source in the Data Source listbox, the data source extracted from the email source (email data, subject, etc.) appears in the Test Result field. Any additional settings then are applied to this extracted data source.
Date: In this sample email, the client did not indicate an order date, so are going to use the email's sent date.
⯈ Click on (1) Date in the Data Source listbox.
As you can see, the whole time stamp Fri, 13 May 2022 21:39:09 +0700
appears in the Test Result field.
We could stop here to store the whole time stamp. Let's assume, however, that we only want the date proper: 13 May 2022
.
⯈ Type 2-4
into the Selected words (counting from beginning of line) field in the Word Limitations group.
That's all we need for column 1 – click Next to continue with column 2.
Client:
⯈ Click on (4) Sender in the Data Source listbox.
The sender name as per From: line in the email header shows up, in this case Logitope
.
Click Next to continue with column 3.
PM:
In the PM column, we want to capture the project manager's name.
⯈ Click on (1) Text body in the Data Source listbox.
You will see the email's text body appear in the Test Result field; note that line-breaks are replaced with <br> tags since Auto Book Databases can store only a single line per record.
⯈ Click on N-th non-empty line from and where a specific text occurs in the Line Limitations group.
⯈ Enter 2
for N.
⯈ Enter Regards OR Wishes OR Greetings OR Sincerely
for Specific Text.
This approach is somewhat fuzzy in so far as the 4 words used as alternatives for Specific Text also could appear in a different context somewhere else within an email. However, for typical order emails, this shouldn't happen often and if it does, the name can be edited in the Data Preview.
Click Next.
PO:
The PO number appears in the email's subject line. Thus:
⯈ Click on (2) Subject in the Data Source listbox.
The content of the data source, New job - PO123456
, appears in the Test Result field.
We want to trim this down to the actual PO number, PO123456
, and there are many ways to do this. The simplest one is:
⯈ Type 1
into the Selected words (counting from end of line) field in the Word Limitations group.
We could also set a Word Limitation requiring that the extracted word begins with PO
, or use any of the methods mentioned in the previous example (Extracting from email text body).
Description, Quantity, and Deadline:
We'll use the same method for all of these, namely:
⯈ Click on (1) Text body in the Data Source listbox.
⯈ Click on N-th non-empty line from and where a specific text occurs in the Line Limitations group.
⯈ Enter 2
for N.
⯈ Enter Description
, Quantity
, or Deadline
, respectively (for columns 4, 5, and 6) into the Specific Text field.
⯈ Optionally, change anything in the where the specific text consists of listbox to a whole line, which will make matching more restrictive and prevent that a wrong line is extracted if any of these words appear elsewhere in the email within a sentence.
Remuneration:
Again, there are many ways to extract the amount and currency. Let's stick with the simplest:
⯈ Click on (1) Text body in the Data Source listbox.
⯈ Activate the Use Standard Format checkbox in the Sub-Line Limitations group.
Nothing else needs to be done, because this piece of data conforms to the Standard Format, since the column is called Remuneration
and the text we want to extract follows Remuneration
and a colon (:
), as prescribed by the Standard Format. (If the column were named differently, we would have to enter Remuneration:
into the Pick text part from field.)
Saving the Extraction Scheme
Only the 2 Comments columns are left. We won't extract anything into these and keep them as a reserve in order to add notes to our records. We can use them, for example, to track whether each record has already been invoiced, etc.
So there's nothing left to do. Click Save and enter a name for the newly created Extraction Scheme. After the Extraction Scheme has been saved, click Exit to close the Extraction Wizard. Then, select the sample email text above and press the Email Source Extraction Hotkey (CTRL+WIN+E
by default). Select the name of the just created Extraction Scheme in the Schemes panel of the Data Preview that appears. All desired data should pop up, ready for being added to a Database via the Add to Database button. If you wish, also enter an Auto Folder pattern based on these data and create and open a folder by activating the corresponding checkboxes.